Proxy ARP on the PFSense
What is Proxy Arp?
Proxy ARP is a technique by which a proxy server on a given network answers the Address Resolution Protocol (ARP) queries for an IP address that is not on that network.
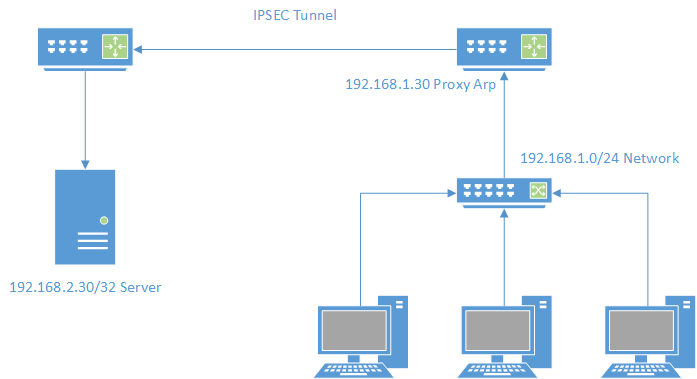
There are a variety of reasons you may want to configure a proxy arp. You may want to disguise the other network, or you may have a firewall configuration that is strict on a particular network. I most commonly use as a way to firewall off a network and allow access to certain resources. The example shows traffic to a connected IPSEC tunnel, but it could really be any other network like a DMZ network, for example.
IPSEC tunnel
I already have the tunnel established between two networks, and have verified data flow. I will not go into detail about setting up the tunnel, but the key to ipsec tunnels is making sure your configuration is the same on both sides. More details can be found on the PFSense docs.

Local Network
The LAN in this scenario is a simple class C subnet in 192.168.1.0/24. The screenshots are taken from a production network, but I have used Photoshop to change the IP ranges. On the PFSense you will want to add a new virtual IP, with the virtual ip type being “Proxy ARP”.
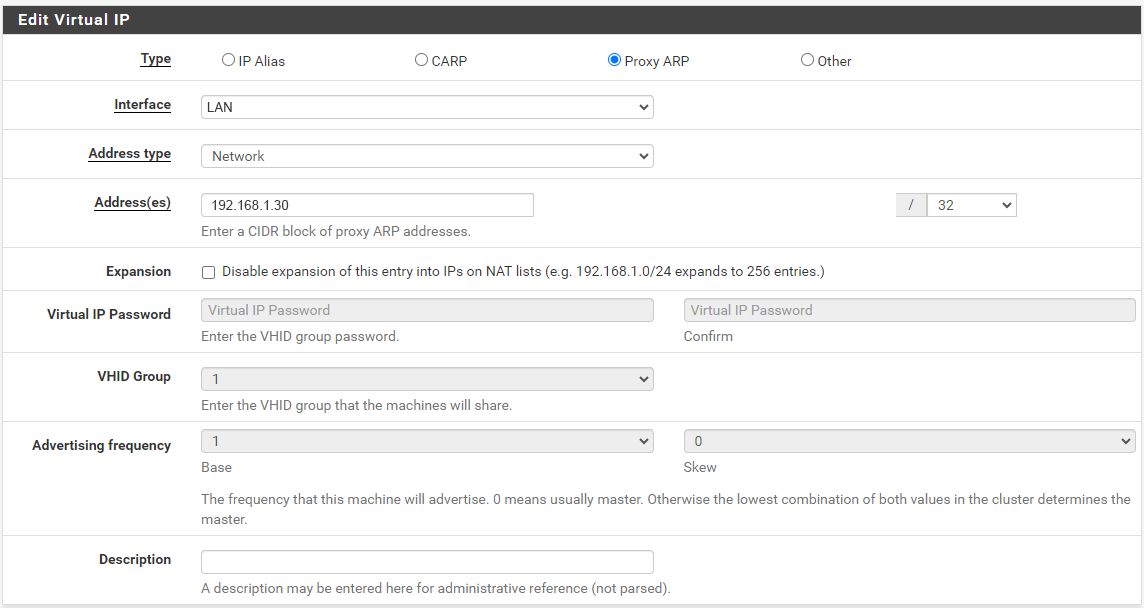
This scenario is just a single IP address, so we maintain the /32 bitmask. This will add an ARP entry to the ARP table on the firewall. It is only an ARP entry, so if you try to ping the IP, you will not get a response. Traffic to that address will, however, be sent to the firewall, so it can be routed to the correct destination.
Forwarding to the Remote Network
Now that we have the Proxy ARP configured on our LAN, we need to send the traffic over to our remote network. The remote network is another C class network of 192.168.2.0/24. We already have it connected via the IPSEC tunnel. On that network we have a server with the IP address of 192.168.2.30. The goal is that a user on the LAN should be able to access the 192.168.1.30 address and the firewall proxy the traffic to the server at 192.168.2.30. To accomplish this, we set up a port-forwarding rule to send traffic destined for 192.168.1.30 to 192.168.2.30.
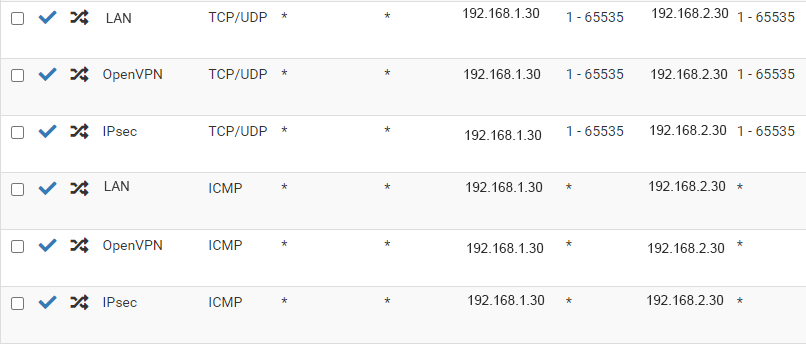
In this scenario, we are forwarding all TCP, UDP and ICMP traffic to the remote server. We could narrow it down to fewer ports if we wanted to. Once the rule is in place users on the LAN should be able to access the remote server using the LAN address.